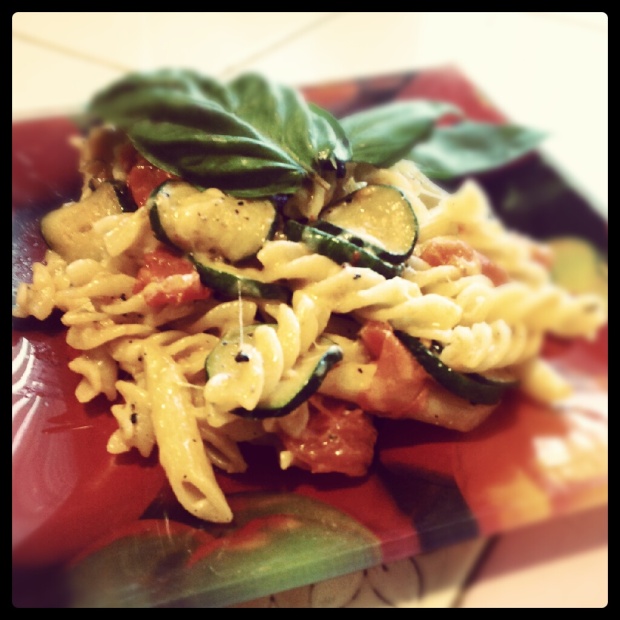
Baked Caprese Pasta (GF)

pastaBaked Caprese Pasta (GF)
the ingredients:

1 pound gluten-free pasta (I used brown rice penne from Trader Joe’s)

1 cup of your favorite pasta/tomato sauce

1/3 cup soy milk (or cow’s milk/heavy cream/half and half)

1/3 cup freshly grated parmesan cheese + more for garnish

4 ounces smoked mozzarella, cut into cubes

1 pint of grape tomatoes (sliced in half)

1 bunch of fresh basil leaves

the method:

Preheat oven to 350 degrees F. Boil water and cook pasta according to directions.

While pasta is cooking, heat tomato sauce over low heat in a large saucepan. Once warm, stir in soy milk and grated parmesan. Once pasta is done cooking, drain and dump into the sauce, mixing to coat and turning off heat. Fold in mozzarella cubes and tomatoes, then chop 3-4 fresh basil leaves and add them in too. Once combined, spray a baking dish with non-stick spray and pour the entire pasta mixture into the dish. Top with fresh mozzarella rounds. Bake for 25 minutes, or until cheese is golden and bubbly.

Top with additional fresh basil and grated cheese. I served Nick’s with some spicy Italian sausage – he had no complaints.

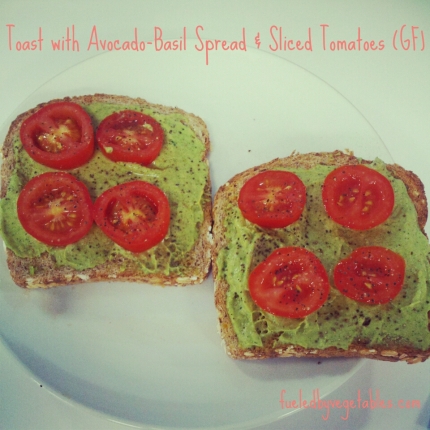
Toast with Avocado-Basil Spread & Sliced Tomatoes (GF)

avoToast with Avocado-Basil Spread & Sliced Tomatoes (GF)

the ingredients:

2 slices gluten-free toast (I used Udi’s)
3 medium avocados (ripe)
2 cups fresh basil leaves
1 tbsp Extra Virgin Olive Oil
3 tbsp non-fat Greek yogurt
3 tbsp lemon juice
1/2 cup sliced cherry tomatoes
salt & pepper to taste


the method:

  1. In a food processor, combine basil leaves and olive oil, pulsing until fine.
  2. Add in avocado, Greek yogurt and lemon juice, blending until smooth.
  3. This spread recipe yields eight servings – yay leftovers! This spread is great on sandwiches, in pasta salad and as a dip. So yummy! 🙂

Margherita Pizza (GF)

margherita pizzaMargherita Pizza (GF)
the ingredients:

  • 1 gluten-free pizza crust (I used Udi’s, but I plan on making my own pretty soon!)
  • 1 pound (2 large) ripe summer tomatoes or 1 16-oz can whole or diced tomatoes
  • 1 clove garlic
  • 1/4 cup loosely packed basil, sliced into ribbons
  • 8 ounces smoked mozzarella cheese, sliced or grated (you can use regular mozzarella – this is just what I had on hand)
  • Salt and pepper


the method:

  1. Heat the oven to 425°F.
  2. Cut the tomatoes into wedges and trim away the stem area. Gently squeeze the wedges over a bowl to remove the excess juices and seeds. Combine the tomatoes with the garlic and half of the basil in the bowl of a food processor or blender. Process until the tomatoes break down into a sauce, scraping down the sides as needed. If desired, strain to make a thicker sauce.
  3. Spread a light layer of the sauce over one of the rounds of pizza. Top with half of the slices of mozzarella. Leave some space between the pieces of mozzarella.
  4. Bake for 7-12 minutes—exact cooking time will vary depending on your oven temperature. Pizza is finished when the crust is deep brown with charred spots and the cheese is bubbling.
  5. Sprinkle the pizza with basil as it comes out of the oven. Let it cool briefly before slicing and serving.


Roasted Red Pepper Pasta (GF)

Red Pepper PastaI just realized how pasta-heavy my posts have been recently. I guess I just feel into the pasta rut with my busy schedule as of late – but that’s no excuse for my lack of creativity! I am going to revamp my food planner later today and make sure there are fewer pasta dishes.

This recipe can be made in 20 minutes and is absolutely delicious (and cheap to make too)!


Roasted Red Pepper Pasta (GF)

the ingredients:

  • 12 ounces, gluten-free pasta (I used rotini)
  • 2 Tablespoons Butter (I used Earth Balance Vegan Spread)
  • 2 Tablespoons EVOO
  • ½ whole Large Onion, Finely Diced
  • 3 cloves Garlic, Minced
  • 1 jar (15.5 Ounces) Roasted Red Peppers, Drained And Roughly Chopped
  • 1 cup Vegetable Broth
  • ½ teaspoons Salt, More To Taste
  • Freshly Ground Black Pepper
  • ½ cup milk or soy milk
  • ½ cup Parmesan Shavings or Rice Dream Vegan Parmesan
  • Finely Minced Parsley
  • Chopped Fresh Basil

the method:

  1. Cook pasta in salted water according to package directions.
  2. Melt 2 tablespoons butter in a large skillet over medium-high heat. Add the onions and garlic and saute for 2 to 3 minutes or until starting to soften. Add the chopped red peppers and cook for 2 to 3 minutes, until hot.
  3. Remove the skillet from the heat. Carefully transfer the contents of the skillet to a food processor or blender. Place on the lid and puree the pepper mixture until totally blended (there will still be some texture to the peppers.)
  4. Heat 2 tablespoons EVOO back to the skillet over medium heat. Pour the pepper puree back into the skillet. Add the broth, salt, and pepper, and stir until heated. Splash in the milk and stir to combine. Taste and adjust seasonings if you need to.
  5. Drain the pasta and add it to the skillet. Add Parmesan and parsley & basil, then stir it together to coat the pasta.
  6. Serve in bowls with extra Parmesan and a sprinkling of basil on top.

One Pot Tomato Basil Pasta (GF)

I started my 200-hour yoga certification about two weeks ago thinking I had all the time in the world. Even though we all need that extra hour every day to get things done, I decided to go after something I have been dreaming about doing for about year – and it’s the best decision I have ever made.  My days are busy, but not chaotic. I go to Ashtanga almost every day after work and spend a good portion of my weekend on the mat, as well. We are currently turning half of our guest bedroom into a mini yoga studio so I can practice when I  have to work late or can’t make it to class for some reason. I have a feeling this will look totally adorable and I will post pictures once it’s ready. 🙂

With a full-time job, a house to take care of and a hungry boyfriend to feed, these last couple of weeks have been exhausting – I don’t know how people with kids do it! Hats off to you!

So far, these yoga classes have been an amazing experience, these teachers are inspirational and have put me in positions I never even dreamed I could do. In order to keep up with the things I enjoy (like cooking), I’ve had to make some compromises. I still fully plan on cooking as much as possible, but I realized I needed to find more convenient meals in order to keep up with my routine and ensure I eat a healthy, home-cooked meal as much as possible.

Even though more of my time is being absorbed since I started certification, I surprisingly feel more balanced. This dish is one that I pinned almost a year ago when looking for quick week-day meals. It’s a one pot dish, so you know that prep and clean up will be a cinch. This dish can also be made vegan easily by omitting the parmesan or substituting it with a vegan option.

Enjoy!

One Pot Tomato Basil PastaOne Pot Tomato Basil Pasta (GF)

the ingredients:

  • 12 ounces gluten free pasta (I used Rotini)
  • 1 can (15 ounces) diced tomatoes with liquid
  • 1 large sweet onion, cut in julienne strips
  • 4 cloves garlic, thinly sliced
  • 1/2 teaspoon red pepper flakes
  • 2 teaspoons dried oregano leaves
  • 2 large sprigs basil, chopped
  • 4 1/2 cups vegetable broth (regular broth and NOT low sodium)
  • 2 tablespoons extra virgin olive oil
  • Parmesan cheese for garnish

the method:

  1. Place pasta, tomatoes, onion, garlic, basil, in a large stock pot. Pour in vegetable broth. Sprinkle on top the pepper flakes and oregano. Drizzle top with oil.
  2. Cover pot and bring to a boil. Reduce to a low simmer and keep covered and cook for about 10 minutes, stirring every 2 minutes or so. Cook until almost all liquid has evaporated – I left about an inch of liquid in the bottom of the pot – but you can reduce as desired .
  3. Season to taste with salt and pepper , stirring pasta several times to distribute the liquid in the bottom of the pot. Serve garnished with Parmesan cheese.

Yep, that’s it!

Homemade Slow Cooker Spicy Marinara and Artisan Bread

One of my favorite things to come home to is a delicious supper that has been in the slow cooker all day. I decided to make Slow Cooker Spicy Marinara so I didn’t really go all out on this one, but I must say, it was one of the best marinara sauces I’ve had in a while (sorry Auntie)!  I did my own little take on this recipe from Life Currents blog, but added some crushed red pepper and a nice glug of red wine because, well…  um do you know me? I’m a firm believer in red wine really bringing out the vibrancy in a tomato sauce – and I think slow cooking the sauce for over 8 hours really allowed the flavors to develop beautifully. I’ve made a lot of pasta sauces for Nick, but I think this one was his favorite. I made a whole ton of this stuff because you can freeze it and it keeps FOREVER.

I also thought about grabbing an Italian loaf to make some homemade garlic bread – but it isn’t really totally homemade unless you make the bread too, right? It dawned on me that I had just added a 5-minute Artisan bread recipe to my Pepperplate account so I decided to try it out. I failed to get a picture of the bread itself, but in the picture below, you can see the final product – Herb and Cheese Garlic Bread (obviously not vegan, but can easily be made vegan with shredded Daiya cheese). I made a VERY small loaf so I only let it rise about an hour before tossing it in the oven and still came out delicious and golden-brown in color. I made a ton of more dough, so expect to see a picture of one these beauties in the near future.

I put together this little Italian dish for the two of us:


Slow Cooker Spicy Marinara

Ingredients:

Makes 13 (½ cup) servings

  • 8 cups crushed tomatoes or 2 (28 oz.) cans crushed tomatoes
  • 1 (6 oz.) can tomato paste
  • 1/2 cup red wine
  • 1 medium onion, coarsely chopped
  • 2-4 cloves garlic, finely chopped
  • 2 whole bay leaves
  • 1 tablespoon dried basil
  • ½ tablespoon dried oregano
  • 1 tablespoon brown sugar
  • 1 tablespoon balsamic vinegar
  • dash of crushed red pepper flakes
  • 1 teaspoon salt, if desired
  • freshly ground pepper

The Method:

  1. Place all ingredients in the slow cooker. Stir well to combine. Secure the lid on your slow cooker and cook on low for 8 hours or high for 6 hours. Stir the sauce and remove the bay leaves. Taste for seasonings, adding more salt and some freshly ground pepper as desired.

5 Minute Artisan Bread

Makes (4) 1lb. loaves

Ingredients:

  • 3 cups lukewarm water
  • 1 1/2 tablespoons granulated yeast (2 packets)
  • 1 1/2 tablespoons kosher salt or 1 1/2 tablespoons other coarse salt
  • 6 1/2 cups flour, unsifted, unbleached, all-purpose (not strong)

The Method:

Preparing Dough for Storage:

  1. Warm the water slightly. It should feel just a little warmer than body temperature. Warm water will rise the dough to the right point for storage in about 2 hours. With cold water it will need 3-4 hours.
  2. Add the yeast to the water in a 5 quart bowl or, preferably, in a resealable, lidded (not airtight) plastic food container or food-grade bucket. Don’t worry about getting it all to dissolve.
  3. Mix in the flour and salt – kneading is unnecessary. Add all of the flour at once, measuring it in with dry-ingredient measuring cups, by gently scooping up the flour, then sweeping the top level with a knife or spatula. Don’t press down into the flour as you scoop or you’ll throw off the measurement. Mix with a wooden spoon, a high-capacity food processor (14 cups or larger) fitted with the dough attachment, or a heavy duty stand mixer fitted with the dough hook until the mixture is uniform. If you’re hand mixing and it becomes too difficult to incorporate all the flour with the spoon, you can reach into your mixing vessel with very wet hands and press the mixture together. Don’t knead, it isn’t necessary. You’re finished when everything is uniformly moist, without dry patches. It takes a few minutes, and will yield a dough that is wet and loose enough to conform to the shape of its container.
  4. Allow to rise. Cover with lid (not airtight or it could explode the lid off). Allow the mixture to rise at room temperature until it begins to collapse (or at least flattens on the top), approx 2 hours, depending on room temperature, and initial water temperature Longer rising times, up to 5 hours, won’t harm the result.
  5. You can use a portion of the dough any time after this period. Fully refrigerated dough is less sticky and easier to work with than dough at room temperature.

Ready to bake? Follow the instructions below:

  1. Prepare your loaf tin, tray, or whatever you’re baking it in/on. Sprinkle the surface of your refrigerated dough with four. Pull up and cut of a grapefruit-size piece of dough (c 1 lb), using a serrated knife.
  2. Hold the mass of dough in your hands and add a little more flour as needed so it won’t stick to your hands. Gently stretch the surface of the dough around to the bottom on all 4 sides, rotating the ball a quarter-turn as you go. Most of the dusting flour will fall off – that’s fine, it isn’t meant to be incorporated. The bottom of the loaf may appear to be a collection of bunched ends, but it will sort itself out during resting and baking.
  3. The correctly shaped final product will be smooth and cohesive. The entire process should take no more than 30 – 60 seconds.
  4. Rest the loaf and let it rise in the form, on the tray/pizza peel, for about 40 minutes Depending on the age of the dough, you may not see much rise during this period. That’s fine, more rising will occur during baking.
  5. Twenty minutes before baking, preheat the oven to 450°F Place an empty broiler tray for holding water on any other shelf that won’t interfere with the rising bread.
  6. Dust and Slash. Dust the top of the loaf liberally with flour, which will allow the slashing knife to pass without sticking. Slash a quarter inch deep cross, diagonal lines, or tic-tac-toe pattern on top using a serrated knife.
  7. After a 20 min preheat you’re ready to bake, even though the oven thermometer won’t be at full temperature yet. Put your loaf in the oven. Pour about 1 cup of hot water (from the tap) into the broiler tray and close the oven to trap the steam.
  8. Bake for about 30 minutes, or until the crust is nicely browned and firm to the touch.
  9. Store the rest of the dough in the fridge in your lidded (not airtight) container and use it over the next 14 days. The flavour and texture improves, becoming like sourdough. Even 24 hours of storage improves the flavour.

Summer Skillet Pasta

So, I’m not a huge fan of zucchini. There’s something about its vibrant color that makes you think you’re biting into a veggie that’s packed full of flavor. It’s actually the same way I feel about eggplant. However, the Whole Foods by my work had the most beautiful zucchini arrangement last week and I couldn’t help but buy one and hope that I that I find a yummy recipe to put it in. Turns out, I did.

I introduce to you, Summer Skillet Pasta. I took this recipe from one on of my favorite blogs, Iowa Girl Eats. Her recipe calls for chicken sausage, but since I am a vegetarian, I decided not to use that ingredient (obvi). I know that there is some yummy vegetarian sausage at every grocery store, and I’m going to be honest with you ­– I was too lazy to get it. In my opinion, omitting that spicy sausage flavor didn’t take away from the dish at all.

This skillet took about 20 minutes to make, so it was perfect. (Did I mention how lazy I was feeling that day?)

Summer Skillet Pasta:

Ingredients:

8 oz penne, dry (or any pasta)
1/2lb spicy chicken sausage
2 Tablespoons extra virgin olive oil
4 garlic cloves, sliced
1/2 shallot, sliced
1 zucchini, halved and sliced
salt & pepper
10oz cherry tomatoes
fresh basil
Romano or parmesan cheese, if desired

The Method:

1. Heat the skillet over medium and add extra virgin olive oil to the skillet. Add garlic slices and shallots and cook until they start to turn golden brown, about 1 minute. Add zucchini, season with salt and pepper, then saute until tender, about 4-5 minutes. Add cherry tomatoes then place a lid on top of the skillet and allow tomatoes to get hot and tender, about 3 minutes, stirring once or twice.

2. Meanwhile, cook penne in a large pot of salted boiling water. Reserve 1/2 cup pasta cooking water before draining.

3.. Add some of the pasta cooking water to create a sauce and make sure pasta isn’t sticking together Serve topped with torn fresh basil, and grated Romano or Parmesan cheese, if desired.

Creamy Caprese Pasta

There is something about the flexibility of the word “caprese” the sparks my immediate interest whenever I’m looking through recipes. I’ve made caprese skewers, caprese pizza and of course, the world-famous caprese salad. My roommate and her father can vouch for my overwhelming love for plump tomatoes. Her dad grows them himself and they are so perfectly ripe that I MUST cook with them.


After receiving my latest batch of tomatoes, I stumbled across yet ANOTHER version of caprese – Creamy Caprese Pasta. The flavors of the plump tomatoes, fresh basil and ooey-gooey mozzarella complement each other so well – not to mention, it was really easy to make and cheap too AND it’s carnivore approved – right Nick? I’m a mean girlfriend and didn’t pair any meat with this dish, but I think it was rich enough to satisfy the taste-buds of a hungry bear boyfriend J.


If I can offer one more tip, make a HUGE batch of this stuff. It keeps well and is perfect as lunch the next day or even for dinner with a fresh salad. Enjoy!

Ingredients:

  • 1 pound whole wheat pasta (noodles such as penne work best)
  • 1 cup of your favorite pasta/tomato sauce
  • 1/3 cup heavy cream or half and half
  • 1/3 cup freshly grated parmesan cheese + more for garnish
  • 4 ounces fresh mozzarella, cut into cubes
  • 1 pint of grape tomatoes (I cut some in half and left some whole)
  • 1 bunch of fresh basil leaves

The Method:

  1. Preheat oven to 350 degrees F. Boil water and cook pasta according to directions.
  2. While pasta is cooking, heat tomato sauce over low heat in a large saucepan. Once warm, stir in heavy cream and grated parmesan.
  3. Once pasta is done cooking, drain and dump into the sauce, mixing to coat and turning off heat.
  4. Fold in mozzarella cubes and tomatoes, then chop 3-4 fresh basil leaves and add them in too.
  5. Once combined, spray a baking dish with non-stick spray and pour the entire pasta mixture into the dish. Top with fresh mozzarella rounds.
  6. Bake for 25 minutes, or until cheese is golden and bubbly.
  7. Top with additional fresh basil and grated cheese.

Baked Gemelli with Pecorino and Smoked Mozzarella


Yeah… so you may have noticed that I’m kind of in the middle of a love affair with smoked cheeses. They are just so gosh darn yummy!

Since it’s birthday season in my world, my wallet has been a little tight – not to mention Mondays are usually very long days for me with work, gym, boy toy, loving on my dog… you get the picture. I had slacked on my running schedule over the weekend so I really pushed myself yesterday. When I left the gym, all I really wanted to eat was a big heaping bowl of pasta. I wanted a recipe that was full of flavor but required minimal effort.

Enter the simple and oh-so-scrumptious Baked Gemelli. As simple as it was, this is one of my favorite things I’ve made so far. I think Nick would have to agree…

Ingredients:

  • 1 pound dried Gemelli pasta
  • Kosher salt
  • 3 1/2 cups My Favorite Tomato Sauce (or any type of tomato/marinara sauce)
  • 1/2 cup freshly grated Parmesan, divided
  • 1/4 cup grated pecorino romano
  • 1/2 pound fresh mozzarella, half cut into 1/2-inch cubes and half thinly sliced
  • 1/2 pound smoked mozzarella, half cut into 1/2-inch cubes and half thinly sliced
  • 3 cloves garlic, minced
  • 1/4 medium yellow onion, chopped
  • 1 tbsp. EVOO
  • Thyme, to taste (I like A LOT)
  • Freshly ground black pepper
  • Pinch of crushed red pepper or to taste

Instructions:

  1. Preheat the oven to 400 degrees F. Bring a large pot of water to a boil, salt generously, and boil the pasta until al dente, tender but still slightly firm. Drain.
  2. While the pasta is boiling, heat the EVOO in a small skillet over medium heat. Add the onions, garlic and thyme. Saute until the onions are transparent, about 5 minutes.
  3. In a large bowl, toss the cooked pasta with the tomato sauce, sauteed onion/garlic/thyme mixture, 1/4 cup of the Parmesan, the pecorino, and the cubed mozzarella pieces. Season with the black pepper and red pepper to taste, and mix until well combined. Transfer the pasta to an oiled 9- x 13-inch baking dish. Cover the top of the pasta with the sliced mozzarella, and sprinkle with the remaining Parmesan. Bake until lightly browned and hot, about 30 minutes. Serve immediately.